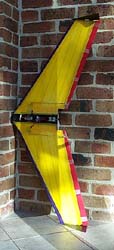
Zagi 400X
History
Having previously built a traditional balsa glider (a Capella)
I lost interest in flying radio control aircraft for a number
of reasons, but mainly because of the difficulty of having to
go somewhere to fly, difficulty getting someone to teach me how
to fly, and the problem of one small error leading to a large
repair job.
Many years later I decided to have another go since I could
fly in my 'back yard' (see below). I was going to repair and fly
the Capella - however, there were a number of problems:
The landing ground is rough and can't easily be mown, I could
see many more repairs...
I needed something that could launch itself
I wasn't sure that I wanted the problems of difficult repairs
I needed to be able to 'teach myself' - after all its my
'back yard'...
A small amount of, admitedly unscientific, research led me
to conclude that something like a Zagi would be just what I needed.
Living in Australia that meant that whatever was available locally
would be what I want. It turned out that the 400X was what was
available.
The 400X has turned out to be great, I can use it to slope/wave
soar on moderately windy days or just use the electric power on
still days.
Why Build a Zagi?
The main reasons I can suggest for building a Zagi are:
- They are fun to fly!
- They are simple to build.
- They are simple to repair.
- It takes a big accident to do serious damage to a Zagi.
Can you teach yourself to fly?
This is a subject of much debate: however, you can teach
yourself to fly a Zagi. Having said that there are a few provisos:
- You need somewhere suitable to start flying. Suitable means
you can't damage anybody or anything! Suitable also means an
appropriately sized area, while it is possible to fly a Zagi
in a small space you need a larger space as a beginner.
- A simulator (for example FMS, or RealFlight) is essential.
Put in enough time on the simulator and your first flight will
go fine! In my case I spent a lot of time on RealFlight practicing
circuits and landings in the PT-40 trainer and then using the
Zagi model in FMS to practice flying and landings with the Zagi.
Information for Beginners
- Before you buy and start building your Zagi get a simulator
and use it to practice your flying. Once you have built your
Zagi you will want to fly it immediately and the way to avoid
big disapointments is to have some simulator experience. The
simulator will let you get used to control-reversal when the
Zagi is flying towards you and also give you experience at determining
which way the Zagi is going when viewed from a distance - this
is not always as easy as it sounds.
- Before you start construction read all the info on the
Internet. I recommend www.yourzagi.com
as the place to start. I followed the instructions at www.clubzagi.com
for constructing a 400X and finished up only 0.4oz overweight
and with the CG in exactly the correct spot! Read all
this material before you start, a lot of it may not make sense
when you read it but you will know later on when you need the
information you read earlier.
- When you buy your Zagi kit purchase an extra roll of coloured
tape so that you can make the top light coloured, and the
bottom dark coloured. For a beginner this will really help,
believe me. If you stick to the light top/dark bottom this will
match the FMS Zagi model, and this aids with transfering your
simulator experience to real flight!
- Have faith in the 3M Super77 glue! Yes this will really
hold the thing together. Here in Australia we can still get
the original Super77 - and yes, it will hold the Zagi together.
- During construction you will shape two elevons, make a
paper template for the finished elevons. It is almost
certain (like death and taxes) that you will need to make
replacement elevons! It is easier to make a replacement if you
have a template.
- It is absolutely essential to either colour the battery
pack, or attach a streamer to the pack. If you don't you
are likely to never find the battery pack again on the first
serious impact. The 'break-away' construction is really important,
once the battery pack is ejected the bulk of the energy goes
with it and the damage to the Zagi itself is reduced - but you
still have to find the battery pack! In my case I opted to go
with the streamer solution, I used florescent pink surveying
tape as the streamer.
- If you are following the ClubZagi instructions make sure
that elevon hinge nearest the motor is positioned so that the
elevon control horns attach to the elevons on top of the hinge.
This precaution stops the elevon breaking at the weak point created
by the holes in the balsa elevons. See below for pictures of
this.
- If you have a Futaba transmitter there is a chance that you
will need to reverse the throttle 'servo' to get the ESC to function
correctly! I thought that I had a broken ESC until I accidentally
powered it up with the throttle at MAX and found that moving
the throttle to MIN and then back to MAX cause the 'beep-beep'
from the ESC... from here I found some Internet references that
confirmed what I had deduced - that the throttle needed servo
reverse.
- Attach the propeller firmly. If you don't the propellor
will fall off mid flight, then you have the problem of watching
the propellor to see where it is falling at the same time as
gliding your Zagi to earth. This is not as easy as it sounds
if it is only your third flight.
- Pay attention to the correct elevon alignment prior
to your glide test. Although it looks 'funny' all the information
on the Internet and in the manual is correct regarding the elevon
neutral position - follow the line of the lower wing surface.
- The Zagi will glide further that you think once you get the
throw right - make sure you have lots of space.
- When you get to the preflight glide tests you need to throw
the Zagi fairly hard. The major damage so far to my Zagi
was during the initial tests as the Zagi hit the ground... eventually
I was frustrated and threw a bit harder and the Zagi glided perfectly...
almost hitting a number of obstacles... remember you need enough
space for this...
- Eventually you will get tired of the thing hitting the ground
and you are going to decide to just go for the throttle... what
you need to know in advance is that when you hit the throttle
the Zagi will tend to head left... so be ready!
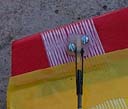
Elevon Control Horns
|
If you are following the ClubZagi instructions make sure that
you place the elevon hinge nearest the motor so that the control
horn will attach in the centre of the hinge. This is shown on
the right. This requires a bit of planing because your natural
inclination is to place the first hinge near the end of the elevon. |
 |
|
If you don't put the hinge in the same place as the control horn
then the chances are that the edge of the hinge will be just
to one side of the control horn and the moment you have a small
accident the elevon will break along the line of the hinge tape,
and also possibly through the holes for the control horn - as
show here. When this happens you will need the elevon template
you made earlier...you did make one didn't you? |
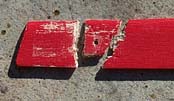
|
The 'Flying Field'
As you can see there are a number of 'interesting' features
here:
- Landing something with wheels would be a real problem.
- The ground slopes away in all directions so you need to get
the landing correct or else the Zagi glides off down hill.
- There are lots of trees to get stuck in, especially as there
is normally a lot of choppy air on the down-wind side of the
hill.
On the plus side:
- In most winds there is some slope/wave lift at altitude over
the hill, so you can easily soar with 25% throttle for 30 minutes.
In the right conditions there is enough lift to power off completely.
- You get great views while flying. The altitute is 950 metres
above sea level, with views to the Great Dividing Range to the
east.
Local Hazards
One of the local hazards are eagles. We have at least one pair
of large eagles that are frequent visitors, they soar along the
ridges with effortless ease. Unfortunately they have tried to
take the Zagi home for lunch! This was very disconcerting when
it happened - I was on 'final approach' trying to land the Zagi
at the same time as trying to manouver to avoid the eagle grabbing
the Zagi with its claws! Other smaller birds of prey don't appear
to be a problem and they will happily soar with the Zagi without
trying to catch it. However, the eagles appear to see a Zagi as
lunch! Perhaps because they have a wingspan that is larger than
the Zagi and they will naturally prey on other birds.
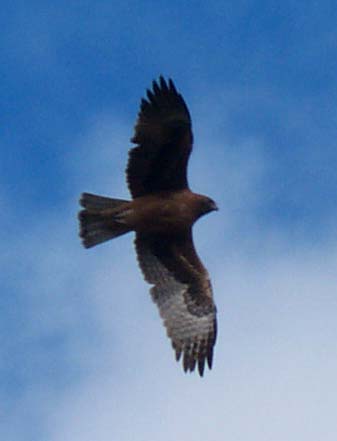
|
This guy is fine if you are a Zagi - not so good if you are a
rabbit. We think it is either a Little Eagle or a Whistling Kite,
the wingspan is fraction smaller than a Zagi. These birds are
happy to hunt while the Zagi is in the air and don't appear at
all distracted as the Zagi flies along the ridge with them. |
|
|
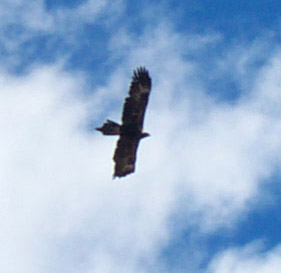
These are the large Wedge Tailed Eagles that we get hunting in
our area. Wing span is larger than a Zagi. To date they have
only been in the area on one occasion while I was flying the
Zagi and on that occasion one of the pair attempted to grab the
Zagi. The bird stayed just above the plane with its legs dangling
down - attempting to get directly above it. |
|
Setup
|
Parameter |
Low Rate |
Normal Rate |
|
Elevon Throw (Aileron) |
+/- 10mm |
+/- 14mm |
|
Elevon Throw (Elevator) |
+/- 6mm |
+/- 8mm |
|
|
|
|
|
Elevon Mix |
+60/-40 |
|
Max Travel |
80% |
|
Rate (Aileron) |
75% |
100% |
|
Rate (Elevator) |
75% |
90% |
|
Exponential (Aileron & Elevator) |
-20% |
-20% |
|
|
|
|
|
Sub Trim (ch2) |
+40 |
|
Throttle correction PMx1 |
ch3->ch1 L/D -10 |
|
Throttle correction PMx2 |
ch3->ch2 L/D -10 |
|
|
|
|
|
Allup Weight |
750 gms (25 oz approx) |